
WebHook
Using a personal WebHook, you can easily connect your custom software or platform to ChipChip to automate WhatsApp messaging. Because we prioritize your privacy, ChipChip’s webhook runs directly on Google Firebase Realtime Database. This leverages Firebase’s free tier while giving you full control over your data - meaning our servers never see or touch your messages.
How It Works
Once configured, you can dispatch an HTTP POST payload from any external application straight to your Firebase instance, and ChipChip handles the delivery in the background.
-
For basic text, the request body can be a straightforward JSON object:
{ "to" : "99999999999" , "text" : "Hello from ChipChip" } - For advanced requirements - such as dispatching multimedia files or rich link previews - you can utilize the built-in Message Builder, which automatically constructs the complex JSON format for you.
Setup Guide
-
Firebase Initialization
Set up a project on Firebase and retrieve your Realtime Database URL (Click here for a quick tutorial).
-
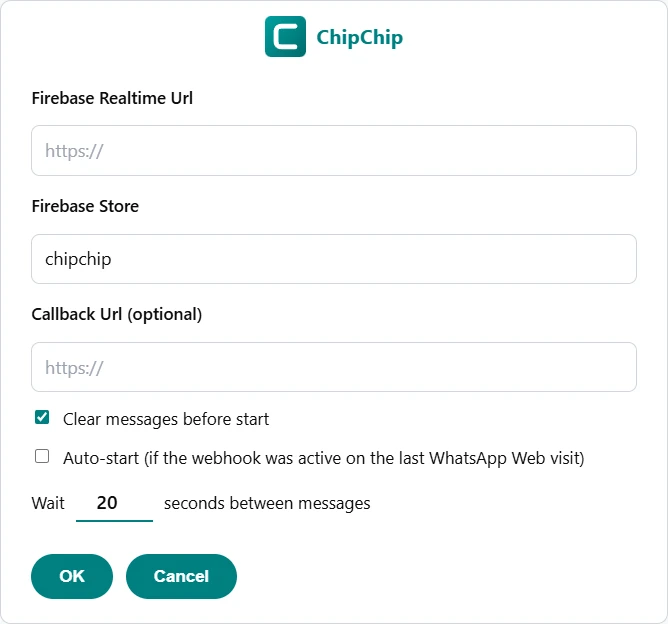
ChipChip Configuration
Open your ChipChip webhook settings, paste your Firebase Realtime URL, and specify your designated store identifier (the default is
chipchip). -
Advanced Parameters
- Callback Url: An optional destination endpoint to receive automated HTTP POST delivery results.
- Clear messages before start: Automatically deletes old messages waiting in Firebase right before launching.
- Auto Start: If turned on, the webhook will automatically reconnect after a WhatsApp Web reload if it was active last time.
- Message Interval: Defines a customized time delay between sequential message dispatches.
-
Activation
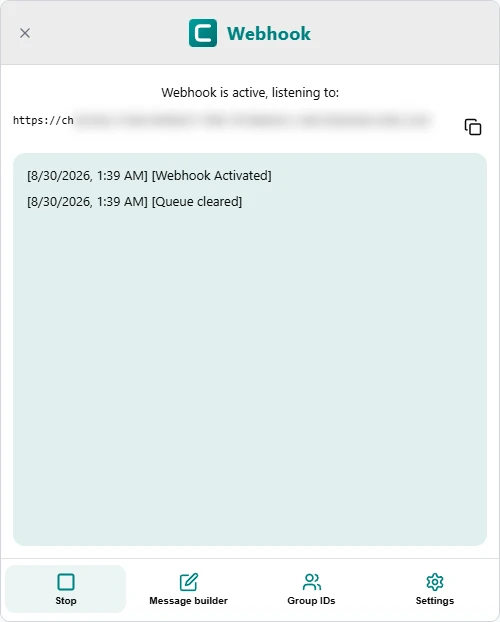
Turn on your webhook. Upon successful startup, you will see a confirmation screen. Your unique ChipChip endpoint URL will be:
https://<firebase realtime url>/<firebase store>/send.jsonClick the copy button to grab this URL, which serves as the destination for your outbound POST requests.
-
Message Builder
Compose rich payloads containing text, emojis, files, and link previews using the Message Builder. It generates ready-to-use JSON and supports dynamic field tags for smooth configuration across various third-party stacks.


- ChipChip’s webhook also features a beta Make app available at:
https://www.make.com/en/hq/app-invitation/15e02f2b508054847ce6b8d95a52446e - Important: Running the ChipChip webhook requires your computer to stay powered on and actively running the extension. Make sure to configure your system to prevent entering “Sleep Mode”.
Examples
Send Message
HTTP POST, JSON
{ "to": "99999999999", "text": "Hello from ChipChip" }
RESPONSE
{ "name": "CcQ7xK2m9p" }
Callback
HTTP POST/OPTIONS, JSON
{ "id": "CcQ7xK2m9p", "sent": true, "time": "14:30, 15.03.2026" }
HTTP POST/OPTIONS, JSON
{ "id": "CcQ7xK2m9p", "sent": false, "time": "14:30, 15.03.2026", "reason": "chat_not_found" }
CORS Configuration for Callbacks
Your callback receiving script must support CORS for both POST and OPTIONS (preflight) requests:
header('Access-Control-Allow-Origin: *');
header('Access-Control-Allow-Methods: POST, OPTIONS');
header('Access-Control-Allow-Headers: Content-Type');